Train Track: Difference between revisions
Create: Minecraft Mod Wiki>Daniel99j1 Added embedding of train tracks |
BoxWithout (talk | contribs) m 29 revisions imported |
||
| (14 intermediate revisions by 4 users not shown) | |||
| Line 1: | Line 1: | ||
'''Train Tracks''' are special blocks used to support [[Trains]]. | '''Train Tracks''' are special blocks used to support [[Trains]]. | ||
{{Block|renewable=Yes|stackable=Yes (64)|tool=Any Pickaxe|blast_resistance=6|hardness=1.5|solid=Yes, while not bending|full=No|transparent=Yes|luminant=No|flammable=No|lavasusceptible=No}} | {{Block|image=Track Block.png|renewable=Yes|stackable=Yes (64)|tool=Any Pickaxe|blast_resistance=6|hardness=1.5|solid=Yes, while not bending|full=No|transparent=Yes|luminant=No|flammable=No|lavasusceptible=No}} | ||
==Obtaining== | ==Obtaining== | ||
===[[Sequenced Assembly]]=== | ===[[Sequenced Assembly]]=== | ||
| Line 6: | Line 7: | ||
{{RecipeTable|Train Track|{{MC|Stone Slab}}, <br> {{MC|Smooth Stone Slab}}, or <br> {{MC|Andesite Slab}} + <br> {{MC|Iron Nugget}} or <br> [[Zinc Nugget]]|[[File:Train Track Recipe.png|270px]]}} | {{RecipeTable|Train Track|{{MC|Stone Slab}}, <br> {{MC|Smooth Stone Slab}}, or <br> {{MC|Andesite Slab}} + <br> {{MC|Iron Nugget}} or <br> [[Zinc Nugget]]|[[File:Train Track Recipe.png|270px]]}} | ||
{{RecipeTableFoot}} | {{RecipeTableFoot}} | ||
==Usage== | ==Usage== | ||
===Placement=== | ===Placement=== | ||
[[File: | ====Manual Placement and Breaking==== | ||
Right-click the ground to place a Train Track facing away from you. Train tracks can be placed in eight different directions corresponding to the closest of the four cardinal direction and 45° increments in between. Tracks may also be placed on the side of blocks that have no blocks immediately above them. These tracks will have a 45° vertical incline. Break tracks using any pickaxe or by right clicking with a wrench while sneaking. Breaking with any other item will cause a track to disappear. | |||
====Assisted Placement==== | |||
Right-click any already placed track with another track in your hand to begin assisted placement. The track in your hand will show a purple highlight. You may then move up to 32 blocks away. With the purple-highlighted track in your hand, right click the ground or another placed track. Tracks will automatically fill between the start and end points. The blocks where you are allowed to end an assisted placement will be highlighted green. Red highlight indicates blocks where you cannot complete an assisted placement. | |||
If a valid material is held in the off-hand and there is open space below the tracks, Create will automatically fill in the blocks immediately beneath the tracks. [[Metal Girder]]s will appear to bend if paved beneath tracks in this manner. | |||
To abort an assisted placement, right click anything with the purple track in your hand while holding Shift (Sneak). Placement assist is required to create curves, slopes, merges, or crossings. | |||
====Aligned versus Unaligned Tracks==== | |||
Tracks laid in one of the eight valid directions are considered "aligned". Aligned tracks can be laid and broken individually. They may be used as the start and end points for assisted placement. | |||
Placement assist can lay tracks in smooth curves where each individual track is not necessarily aligned to one of the eight standard directions. These "unaligned" tracks behave differently than aligned tracks. They cannot be laid or broken individually, only as a set. | |||
Placement assist can also create inclines of varying slope. Tracks on an incline will be unaligned sets unless they are oriented with zero or 45° slopes. | |||
====Curves ==== | |||
[[File:Track Curves.png|thumb|Four smoothed curves on the left with different radii. Four curves of the same size but using the default 8 block radius on the right.|261x261px]]Curves are created using assisted placement. A curve may be only 45° or 90°. Longer curves are created by adding more curving segments to the end of existing ones. A curve must begin and end with an aligned track. | |||
The minimum radius of a curve is eight blocks. This is also the default radius that Create will use. Curves with a larger radius can be created by holding the CTRL key (sprint) while completing the assisted placement. | |||
====Inclines==== | |||
There are two ways to make an incline on a train track, a 45° incline or an S-curve incline. 45° inclines can be any height and length. They may be built manually or using placement assist. When building manually, you must place each track on the face of a block which has no block immediately above it. The transition from level to 45° and back to level must be accomplished with placement assist. When the transition is done manually, it will show a sharp change from level to 45° which trains will not recognize. | |||
<gallery mode="packed"> | |||
Sharp Train Slope.png|Trains will NOT recognize this slope. | |||
Valid Train Slope.png|A valid slope. The solid tracks that were linked are highlighted by [[Andesite Casing]]. | |||
</gallery> | |||
[[File:S curve inclines.png|thumb|Minimum distance S-curve inclines]] | |||
S-curve inclines begin and end with a level track. Their maximum elevation change is 11 blocks and maximum horizontal distance is 31 blocks. However, they may be stacked end to end to create longer inclines, in which case the joint becomes non-horizontal to smooth out the longer incline. For each height of an S-curve incline, there is also a minimum horizontal distance. The green bars in the chart below shows the minimum and maximum horizontal distances for each allowable elevation change. For example, for a 6-block elevation change you will need to start your incline at least 16 blocks out but no more than 31. | |||
[[File:Vertical Track Options Green.png|center|thumb|360x360px|Chart of the minimum and maximum horizontal distances for a given S-curve incline.]] | |||
[[File:Track Merger.png|thumb|Two branches merging or diverging from a central track.]] | |||
====Merges and Crossings ==== | |||
Tracks may merge into one another, diverge from each other, or cross one another. Merging and diverging are essentially the same thing, varying only by which direction a train is moving on the tracks. All forms of merging, diverging and crossing must be built using assisted placement. Thus, the beginning and end points of a merge must be on aligned tracks. Remove a merging track by breaking any of the unaligned tracks approaching the merge point. | |||
[[File:Track Crossings.png|thumb|Examples of tracks crossing.]] | |||
Tracks may cross at any angle, on straight lines or curves. When a crossing is aligned to North-South and East-West, a special Junction block will be displayed. | |||
=== Unloaded Chunks=== | |||
===Unloaded Chunks=== | |||
Trains will also continue through unloaded chunks. When arriving at a station in an unloaded chunk, the Train will stop as it normally does, however the chunk will NOT be loaded. [[Train Schedule]] conditions such as "Item Cargo Condition" may remain unfulfilled; set "Chunk Unloaded" as an alternative condition to have the Train continue anyways. | Trains will also continue through unloaded chunks. When arriving at a station in an unloaded chunk, the Train will stop as it normally does, however the chunk will NOT be loaded. [[Train Schedule]] conditions such as "Item Cargo Condition" may remain unfulfilled; set "Chunk Unloaded" as an alternative condition to have the Train continue anyways. | ||
===Nether Portal Travel=== | ===Nether Portal Travel=== | ||
Train Tracks can go through {{MC|Nether Portal}}s. Simply lead the Track to a portal, and it will link to the other side if it was already loaded once. A set of tracks will appear on the other side of the portal, making it easier to tell which way the Train will emerge from. While a wagon is part way through a nether portal, certain onboard machines such as [[Portable Storage Interface|Portable Storage]] or [[Portable Fluid Interface]]s will not work. | Train Tracks can go through {{MC|Nether Portal}}s. Simply lead the Track to a portal, and it will link to the other side if it was already loaded once. A set of tracks will appear on the other side of the portal, making it easier to tell which way the Train will emerge from. While a wagon is part way through a nether portal, certain onboard machines such as [[Portable Storage Interface|Portable Storage]] or [[Portable Fluid Interface]]s will not work. | ||
===Train Creation=== | === Train Creation=== | ||
Add a [[Train Station]] to a straight track and begin Train Creation via the station's interface. By default, an assembly track can be up to 128 blocks long (adjustable in the [[Config]].) Bogeys cannot be placed on curved Tracks. | Add a [[Train Station]] to a straight track and begin Train Creation via the station's interface. By default, an assembly track can be up to 128 blocks long (adjustable in the [[Config]].) Bogeys cannot be placed on curved Tracks. | ||
===[[Train Signal]]s=== | ===[[Train Signal]]s=== | ||
Train Tracks can logistically be divided into segments by [[Train Signal]]s to control the traffic flow of non-player conductors. Conductors will not enter track a segment occupied by a [[Train]], regardless of the size of the [[Train]] or segment. Pathways can be locked off by activating a [[Train Signal]] with {{MC|Redstone}}, and approaching [[Train]]s will attempt to find another route to their station. | Train Tracks can logistically be divided into segments by [[Train Signal]]s to control the traffic flow of non-player conductors. Conductors will not enter track a segment occupied by a [[Train]], regardless of the size of the [[Train]] or segment. Pathways can be locked off by activating a [[Train Signal]] with {{MC|Redstone}}, and approaching [[Train]]s will attempt to find another route to their station. | ||
== Auto Breaking == | ==Auto Breaking== | ||
Train Tracks can be broken by [[Contraption]]s by using a [[Deployer]] in left-click mode or a [[Mechanical Plough]]. | Train Tracks can be broken by [[Contraption]]s by using a [[Deployer]] in left-click mode or a [[Mechanical Plough]]. | ||
==History== | == History== | ||
*{{GW|0.5}}: Introduced. | *{{GW|0.5}}: Introduced. | ||
{{Blocks}} | {{Blocks}} | ||
[[Category:Railway Equipment]] | [[Category:Railway Equipment]] | ||
Latest revision as of 21:36, 14 February 2025
Train Tracks are special blocks used to support Trains.
Obtaining[edit | edit source]
Sequenced Assembly[edit | edit source]
| Name | Ingredients | Sequenced Assembly |
|---|---|---|
| Train Track | Stone Slab, Smooth Stone Slab, or Andesite Slab + Iron Nugget or Zinc Nugget |
 |
Usage[edit | edit source]
Placement[edit | edit source]
Manual Placement and Breaking[edit | edit source]
Right-click the ground to place a Train Track facing away from you. Train tracks can be placed in eight different directions corresponding to the closest of the four cardinal direction and 45° increments in between. Tracks may also be placed on the side of blocks that have no blocks immediately above them. These tracks will have a 45° vertical incline. Break tracks using any pickaxe or by right clicking with a wrench while sneaking. Breaking with any other item will cause a track to disappear.
Assisted Placement[edit | edit source]
Right-click any already placed track with another track in your hand to begin assisted placement. The track in your hand will show a purple highlight. You may then move up to 32 blocks away. With the purple-highlighted track in your hand, right click the ground or another placed track. Tracks will automatically fill between the start and end points. The blocks where you are allowed to end an assisted placement will be highlighted green. Red highlight indicates blocks where you cannot complete an assisted placement.
If a valid material is held in the off-hand and there is open space below the tracks, Create will automatically fill in the blocks immediately beneath the tracks. Metal Girders will appear to bend if paved beneath tracks in this manner.
To abort an assisted placement, right click anything with the purple track in your hand while holding Shift (Sneak). Placement assist is required to create curves, slopes, merges, or crossings.
Aligned versus Unaligned Tracks[edit | edit source]
Tracks laid in one of the eight valid directions are considered "aligned". Aligned tracks can be laid and broken individually. They may be used as the start and end points for assisted placement.
Placement assist can lay tracks in smooth curves where each individual track is not necessarily aligned to one of the eight standard directions. These "unaligned" tracks behave differently than aligned tracks. They cannot be laid or broken individually, only as a set.
Placement assist can also create inclines of varying slope. Tracks on an incline will be unaligned sets unless they are oriented with zero or 45° slopes.
Curves[edit | edit source]

Curves are created using assisted placement. A curve may be only 45° or 90°. Longer curves are created by adding more curving segments to the end of existing ones. A curve must begin and end with an aligned track.
The minimum radius of a curve is eight blocks. This is also the default radius that Create will use. Curves with a larger radius can be created by holding the CTRL key (sprint) while completing the assisted placement.
Inclines[edit | edit source]
There are two ways to make an incline on a train track, a 45° incline or an S-curve incline. 45° inclines can be any height and length. They may be built manually or using placement assist. When building manually, you must place each track on the face of a block which has no block immediately above it. The transition from level to 45° and back to level must be accomplished with placement assist. When the transition is done manually, it will show a sharp change from level to 45° which trains will not recognize.
-
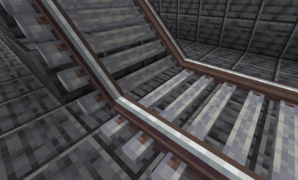 Trains will NOT recognize this slope.
 -
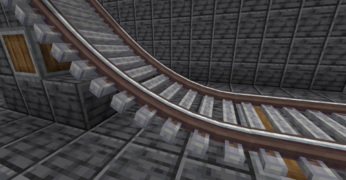 A valid slope. The solid tracks that were linked are highlighted by Andesite Casing.


S-curve inclines begin and end with a level track. Their maximum elevation change is 11 blocks and maximum horizontal distance is 31 blocks. However, they may be stacked end to end to create longer inclines, in which case the joint becomes non-horizontal to smooth out the longer incline. For each height of an S-curve incline, there is also a minimum horizontal distance. The green bars in the chart below shows the minimum and maximum horizontal distances for each allowable elevation change. For example, for a 6-block elevation change you will need to start your incline at least 16 blocks out but no more than 31.


Merges and Crossings[edit | edit source]
Tracks may merge into one another, diverge from each other, or cross one another. Merging and diverging are essentially the same thing, varying only by which direction a train is moving on the tracks. All forms of merging, diverging and crossing must be built using assisted placement. Thus, the beginning and end points of a merge must be on aligned tracks. Remove a merging track by breaking any of the unaligned tracks approaching the merge point.

Tracks may cross at any angle, on straight lines or curves. When a crossing is aligned to North-South and East-West, a special Junction block will be displayed.
Unloaded Chunks[edit | edit source]
Trains will also continue through unloaded chunks. When arriving at a station in an unloaded chunk, the Train will stop as it normally does, however the chunk will NOT be loaded. Train Schedule conditions such as "Item Cargo Condition" may remain unfulfilled; set "Chunk Unloaded" as an alternative condition to have the Train continue anyways.
Nether Portal Travel[edit | edit source]
Train Tracks can go through Nether Portals. Simply lead the Track to a portal, and it will link to the other side if it was already loaded once. A set of tracks will appear on the other side of the portal, making it easier to tell which way the Train will emerge from. While a wagon is part way through a nether portal, certain onboard machines such as Portable Storage or Portable Fluid Interfaces will not work.
Train Creation[edit | edit source]
Add a Train Station to a straight track and begin Train Creation via the station's interface. By default, an assembly track can be up to 128 blocks long (adjustable in the Config.) Bogeys cannot be placed on curved Tracks.
Train Signals[edit | edit source]
Train Tracks can logistically be divided into segments by Train Signals to control the traffic flow of non-player conductors. Conductors will not enter track a segment occupied by a Train, regardless of the size of the Train or segment. Pathways can be locked off by activating a Train Signal with Redstone, and approaching Trains will attempt to find another route to their station.
Auto Breaking[edit | edit source]
Train Tracks can be broken by Contraptions by using a Deployer in left-click mode or a Mechanical Plough.
History[edit | edit source]
- 0.5: Introduced.
| Blocks | |||||||||||||||||||||||||||||||||||
|---|---|---|---|---|---|---|---|---|---|---|---|---|---|---|---|---|---|---|---|---|---|---|---|---|---|---|---|---|---|---|---|---|---|---|---|
| |||||||||||||||||||||||||||||||||||
| |||||||||||||||||||||||||||||||||||
| |||||||||||||||||||||||||||||||||||