Tutorials/Tree Automation: Difference between revisions
Create: Minecraft Mod Wiki>Joker876 |
BoxWithout (talk | contribs) m 11 revisions imported |
||
| (7 intermediate revisions by 4 users not shown) | |||
| Line 1: | Line 1: | ||
Tree farms can provide many resources - This includes {{MC|Log}}, but also, {{MC|Sapling}} (which can be composted for {{MC|Bonemeal}}). Oak trees can produce {{MC|Apple}}, and mangrove trees produce both {{MC|Moss Carpet}}, and {{MC|Mangrove Roots}}. There are many ways to build an automated tree farm. All of them include a [[Contraption]] moving a [[Mechanical Saw]] which harvests the whole tree at once and a [[Deployer]] which plants new saplings. | |||
==Items Needed== | This tutorial covers two types of tree farms, a circular farm which uses rotational power and a linear farm which is powered by minecart contraptions. | ||
==Circular Tree Farm== | |||
===Items Needed=== | |||
*{{ItemLink|Mechanical Saw}} | *{{ItemLink|Mechanical Saw}} | ||
*{{ItemLink|Linear Chassis}} | *{{ItemLink|Linear Chassis}} | ||
| Line 11: | Line 15: | ||
*{{ItemLink|Smart Chute}}, {{ItemLink|Andesite Funnel}}, or {{ItemLink|Brass Funnel}} | *{{ItemLink|Smart Chute}}, {{ItemLink|Andesite Funnel}}, or {{ItemLink|Brass Funnel}} | ||
*Any source of Rotational Power | *Any source of Rotational Power | ||
===Optional Items=== | |||
====Optional Items==== | |||
These items may be needed, but are not required for the Machine to work | These items may be needed, but are not required for the Machine to work | ||
*{{ItemLink|Gearshift}} | *{{ItemLink|Gearshift}} | ||
| Line 17: | Line 22: | ||
*{{ItemLink|Filter}} | *{{ItemLink|Filter}} | ||
==Items Produced== | ===Items Produced=== | ||
Note that this table only covers 5 tree types | |||
{|class="wikitable" | {| class="wikitable" | ||
!rowspan=2|Item | ! rowspan="2" |Item | ||
!colspan=5|Average items of type per tree | ! colspan="5" |Average items of type per tree | ||
!rowspan=2|Notes | ! rowspan="2" |Notes | ||
|- | |- | ||
!style="width: 60px;"|{{MC|Oak}} | ! style="width: 60px;" |{{MC|Oak}} | ||
!style="width: 60px;"|{{MC|Birch}} | ! style="width: 60px;" |{{MC|Birch}} | ||
!style="width: 60px;"|{{MC|Spruce}} | ! style="width: 60px;" |{{MC|Spruce}} | ||
!style="width: 60px;"|{{MC|Jungle tree|Jungle}} | ! style="width: 60px;" |{{MC|Jungle tree|Jungle}} | ||
!style="width: 60px;"|{{MC|Acacia}} | ! style="width: 60px;" |{{MC|Acacia}} | ||
|- style="font-weight: bold;" | |- style="font-weight: bold;" | ||
|{{ItemLink|Logs|mc=true|img=Oak Log}} | |{{ItemLink|Logs|mc=true|img=Oak Log}} | ||
| Line 44: | Line 50: | ||
|1.375 | |1.375 | ||
|3.85 | |3.85 | ||
|These numbers are for total saplings; one sapling has to be placed back! | |These numbers are for total saplings; one sapling has to be placed back! | ||
|- | |- | ||
|{{ItemLink|Stick|mc=true}} | |{{ItemLink|Stick|mc=true}} | ||
|1.65 | |1.65 | ||
|1.65 | | 1.65 | ||
|1.83 | | 1.83 | ||
|1.65 | |1.65 | ||
|2.31 | |2.31 | ||
| | | | ||
|- | |- | ||
|{{ItemLink|Apple|mc=true}} | |{{ItemLink|Apple|mc=true}} | ||
|0.275 | |0.275 | ||
|colspan=4|{{BC}} | | colspan="4" |{{BC}} | ||
|Only {{MC|Oak}} trees drop apples. | |Only {{MC|Oak}} trees drop apples. | ||
|} | |} | ||
==Setup== | === Setup=== | ||
[[File:Tree Farm.png|thumb|400px|The Setup for farming 1x1 trees.]] | [[File:Tree Farm.png|thumb|400px|The Setup for farming 1x1 trees.]] | ||
#Clear a circular area of desired size where the trees are going to grow. Remember about the sides, as different trees require different space around them. | #Clear a circular area of desired size where the trees are going to grow. Remember about the sides, as different trees require different space around them. | ||
#Place a [[Mechanical Bearing]] in the middle 1 block above the ground, with the sticky side facing down. This should resemble the radius of the circle. | #Place a [[Mechanical Bearing]] in the middle 1 block above the ground, with the sticky side facing down. This should resemble the radius of the circle. | ||
#Attach a row of [[Linear Chassis]] to the bearing. The stickable side should be facing outwards. | #Attach a row of [[Linear Chassis]] to the bearing. The stickable side should be facing outwards. | ||
#Attach 2 [[Mechanical Saw]] | #Attach 2 [[Mechanical Saw|Mechanical Saws]] to the outer end of the Chassis (on the non-stickable side), facing in the direction of rotation of the bearing. Use [[Super Glue]] to stick them on. | ||
#Attach a [[Deployer]] to the outer end of the Chassis structure, on the opposite side of the Saws, 1 block from the end of the Chassis, facing towards the end. | #Attach a [[Deployer]] to the outer end of the Chassis structure, on the opposite side of the Saws, 1 block from the end of the Chassis, facing towards the end. | ||
#Put a [[Filter]] or a single {{MC|Sapling}} in the Deployer's filter slot. | #Put a [[Filter]] or a single {{MC|Sapling}} in the Deployer's filter slot. | ||
| Line 71: | Line 78: | ||
#Attach a [[Portable Storage Interface]] on the end of the Chassis, on the top side, facing outwards. Use Super Glue to stick it on. | #Attach a [[Portable Storage Interface]] on the end of the Chassis, on the top side, facing outwards. Use Super Glue to stick it on. | ||
#Choose the location of the storage, and put a second interface there, 1 block apart. The two interfaces will connect when the whole structure will be passing by the stationary interface. | #Choose the location of the storage, and put a second interface there, 1 block apart. The two interfaces will connect when the whole structure will be passing by the stationary interface. | ||
#Attach a [[Smart Chute]] to the stationary Storage Interface. You can also use other means of item transportation, such as a {{MC|Hopper}} or [[Funnel (disambiguation)|Funnel]]. | # Attach a [[Smart Chute]] to the stationary Storage Interface. You can also use other means of item transportation, such as a {{MC|Hopper}} or [[Funnel (disambiguation)|Funnel]]. | ||
#Provide some saplings to the Chest. The Deployer will take and place them when the machine is started. | #Provide some saplings to the Chest. The Deployer will take and place them when the machine is started. | ||
#Provide Rotation Force to the upper side of the Mechanical Bearing. The machine will start rotating. | #Provide Rotation Force to the upper side of the Mechanical Bearing. The machine will start rotating. | ||
#If the structure is rotating in the wrong direction, place a [[Gearshift]] above the bearing and power it with a lever. | #If the structure is rotating in the wrong direction, place a [[Gearshift]] above the bearing and power it with a lever. | ||
#If you want to have a way of stopping the structure, do the following: | #If you want to have a way of stopping the structure, do the following: | ||
##Using a [[Wrench]], set the Movement Mode of the bearing to "Only Place when Anchor Destroyed" (the 3rd option). | ##Using a [[Wrench]], set the Movement Mode of the bearing to "Only Place when Anchor Destroyed" (the 3rd option). | ||
##Place a [[Clutch]] above the bearing or the gearshift, if used. | ##Place a [[Clutch]] above the bearing or the gearshift, if used. | ||
##Place a lever on the clutch. Powering it will stop the rotation, but the parts of the machine will not be placed, preventing the saplings from being destroyed. | ## Place a lever on the clutch. Powering it will stop the rotation, but the parts of the machine will not be placed, preventing the saplings from being destroyed. | ||
==Linear Tree Farm== | |||
[[File:TreeFarmFinal.png|thumb|360x360px|Linear Tree Farm]] | |||
This design produces a very efficient farm that can be extended as far as desired in both length and width. It can simultaneously grow a variety of trees. | |||
===Items Needed=== | |||
{| class="wikitable" | |||
!Contraption | |||
!Rail | |||
!Timer | |||
!Farm | |||
|- style="vertical-align: top; font-size:80%;" | |||
|42 - {{ItemLink|Linear Chassis|mc=true}}<br> | |||
13 - {{ItemLink|Mechanical Saw|mc=true}}<br> | |||
9 - {{ItemLink|Deployer|mc=true}}<br> | |||
4 - {{ItemLink|Chest|mc=true}}<br> | |||
2 - {{ItemLink|Portable Storage Interface|mc=true}}<br> | |||
1 - {{ItemLink|Smart Chute|mc=true}}<br> | |||
1 - {{ItemLink|Slimeball|mc=true}}<br> | |||
1 - {{ItemLink|Super Glue|mc=true}} | |||
| 1 - {{ItemLink|Cart Assembler|mc=true}}<br> | |||
1 - {{ItemLink|Minecart|mc=true}}<br> | |||
17 - {{ItemLink|Rail|mc=true}}<br> | |||
3 - {{ItemLink|Powered Rail|mc=true}}<br> | |||
2 - {{ItemLink|Redstone Torch|mc=true}} | |||
|2 - {{ItemLink|Redstone Repeater|mc=true}}<br> | |||
1 - {{ItemLink|Pulse Repeater|mc=true}}<br> | |||
1 - {{ItemLink|Lever|mc=true}}<br> | |||
4 - {{ItemLink|Redstone Dust|mc=true}}<br> | |||
|4 Stacks - {{ItemLink|Birch Slab|mc=true}}<br> | |||
4 - {{ItemLink|Torch|mc=true}}<br> | |||
32 - Each type of seedling | |||
|} | |||
[[File:TreeFarmLayout.png|thumb|270x270px|Layout of the Tree Farm]] | |||
===Layout=== | |||
Begin by marking out a rectangle 23 blocks by 18 blocks. Against the right corner of one of the longer sides, dig a hole four blocks deep, five blocks in width, and seven blocks in length. | |||
===Underground Rail Line=== | |||
[[File:TreeFarmRail.png|thumb|270x270px|Rail Line and Tunnel]] | |||
From inside the hole, dig a two block wide tunnel along the right side of the rectangle for the full length. The right side of the tunnel should be level with the bottom of the hole and three blocks high. The left side of the tunnel should start one block above the bottom of the hole and be two blocks high. This forms a bench along the left side of the tunnel on which to run the rails. | |||
Extend the rail bench two blocks into the hole. Place an ''unpowered'' [https://minecraft.fandom.com/wiki/Powered_Rail Powered Rail] at the end of the extension followed by a normal rail then a ''powered'' [https://minecraft.fandom.com/wiki/Powered_Rail Powered Rail]. Fill the rest of the tunnel with rails using Powered Rails and Redstone Torches approximately every 16 blocks. End the rail line with a Powered Rail abutting a solid block. This will cause the harvester contraption to return to the start point. | |||
Place a [[Cart Assembler]] over the final [https://minecraft.fandom.com/wiki/Powered_Rail Powered Rail] with the arrow pointing toward the farm. Right click and hold on the center part of either side of the [[Cart Assembler]] to bring up the setting menu. Slide the tab all the way to the right to select "'''Lock rotation'''". | |||
[[File:TreeFarmBack.png|thumb|429x429px|Assembling the Contraption]] | |||
===Harvesting Contraption=== | |||
Stack two [[Linear Chassis]] on top of the [[Cart Assembler]] with the light colored sides facing forward and back. At ground level, place 23 [[Linear Chassis]], with the second from the right lining up above the Cart Assembler. Hold Ctrl and use a [[Wrench]] to set the sticky range of all of the [[Linear Chassis]] to 1. | |||
Numbering the ground level chassis 1 to 23 from right to left (see picture to the right), place a column of two chassis above chassis 3, 8, 11, 15, 17, 19, 21, and 23. Place another chassis two blocks above chassis 12. The odd spacings account for the varying sizes of tree. | |||
[[File:TreeFarmDeployers.png|thumb|270x270px|Placing Saplings into Deployer Filters]] | |||
Using a [https://minecraft.fandom.com/wiki/Slimeball Slimeball], coat the top chassis in each column and attach a [[Deployer]] with the hand facing down. Rotate the Deployer with a [[Wrench]] to place the filter slot facing backward. Place a different sapling into the filter slot of each [[Deployer]]. The five Deployers on the left are for the Birch, Acacia, Jungle, Spruce, and Oak in any order you desire. Place Dark Oak saplings in the pair of Deployers above chassis 11 and 12. Place a Cherry sapling in the Deployer above chassis 8. Finally place a Mangrove Propagule in the right most Deployer. | |||
[[File:TreeFarmFront.png|thumb|457x457px|Front Side of Harvesting Contraption]] | |||
On the front side of the contraption, use a [https://minecraft.fandom.com/wiki/Slimeball Slimeball] to attach [[Mechanical Saw|Mechanical Saws]] at ground level. Chassis 1 through 5 each get a Mechanical Saw so as to catch the Mangrove Roots that can be offset from the center of the tree. Place another saw at ground level in front of each of the remain deployers. Finally, using a Slimeball, attach two chests in any of the three double gaps between saws. These chest are to hold saplings for planting. However they will also accumulate a few of every other item. This is normal. | |||
===Planting Template=== | |||
[[File:TreeFarmTemplate.png|thumb|270x270px|Sapling Planting Template]] | |||
The [[Deployer|Deployers]] will attempt to plant a seedling on every grass block they encounter. Wooden slabs are placed to replace grass blocks in areas where planting is unwanted. Activate the harvesting contraption and temporarily remove it using a [[Wrench]] to give access to the grass beneath the contraption. | |||
Replace three rows of grass with slabs along the bottom of the rectangle you laid out. Leaving a hole above the cart assembler is optional. At the far end of the grove, replace the end row with slabs. Place slabs in the planting area in accordance with the figure labeled "Sapling Planting Template." Planting spots for Birch, Acacia, Jungle, Spruce, and Oak are each separated by three slabs as you move along the columns of the template. Acacia and Spruce are offset from the others by two blocks. Dark Oak grows in a 2x2 plot, each separated by 2x2 slabs. Cherry and Mangrove trees are very large, so 5 slabs are used between each planting spot. The first Mangrove planting spot is also offset back to the sixth block from the contraption to allow room for the roots. | |||
Place torches in the columns between the trees to allow the saplings to grow during the night. | |||
===Storage=== | |||
[[File:TreeFarmStorage.png|thumb|270x270px|Setup Storage]] | |||
Place a [[Portable Storage Interface]] on the left wall three blocks above the bottom of the hole and in line with the chassis. Below the [[Portable Storage Interface]], place a [[Smart Chute]], and below that a Chest or Barrel .Set the Smart Chute's filter to extract EXACTLY 32. This will help to maintain enough saplings in the contraption chests for replanting. | |||
Attach another [[Portable Storage Interface]] against the bottom [[Linear Chassis]], facing the first Portable Storage Interface. Use [[Super Glue]] to attach this Portable Storage Interface rather than a {{MC|Slimeball}} - Do this by clicking on the Portable Storage Interface to start the gluing action, then click on the [[Cart Assembler]] to complete the action. | |||
For long term harvesting, you can replace the Chest with a larger [[Item Vault]] or route the produce to other automation using a [[Mechanical Belt]]. | |||
===Activating the Contraption=== | |||
Confirm the [[Cart Assembler]] has '''Lock Rotation''' configured. If not, set it to lock rotation, place the contraption back in the assembler and cycle the power to off and on again. Remove the contraption with the [[Wrench]]. | |||
Place a solid block immediately behind the [[Cart Assembler]]. It will stick out in mid air with a one block gap with the ground. This block will force the contraption to move forward when the {{MC|Powered Rail}} is activated. Remove the [[Cart Assembler]] and the power source used to control it. Then replace the Powered Rail that also pops off. | |||
While standing next to the solid block and facing the tree farm, place the contraption on the unpowered {{MC|Powered Rail}}. | |||
===Setting a Timer=== | |||
The timer requires one Lever, two Redstone Repeaters, one [[Redstone Additions|Pulse Repeater]], and four Redstone Dusts. Place a Redstone Repeater facing into the block beneath the contraption's cart. Set this repeater to four ticks delay. Place a Lever immediately to the left of the repeater. Place a Redstone Dust immediately in front of both the lever and repeater. Place a second repeater in front of either of the Redstone Dusts facing away from the mine cart. Set this to two tics delay. Place a [[Redstone Additions|Pulse Repeater]] next in front of the other Redstone Dust facing the cart. Set the delay to 5 minutes or as desired. Place two more Redstone Dusts in front of the [[Redstone Additions|Pulse Repeater]] and the second Redstone Repeater. | |||
===Operating the Farm=== | |||
The farm is now ready to operate. To start the clock, momentarily turn the lever on and back off. (Note a button generates too long of a pulse which interferes with the feedback loop.) The farm will run continuously until the clock is interrupted by breaking any one of the redstone dust lines. The contraption should keep a sufficient number of saplings in the contraption chest to allow replanting. It will pass excess saplings into storage. | |||
''IMPORTANT'': There is a risk of running out of saplings. If you notice a column of trees is missing, simply place some more of that type of sapling in the contraption chest. | |||
=== Production Rate=== | |||
{| | |||
|+ style="text-align: left; margin-left: 3em;" |<i>Stacks produced per hour</i> | |||
|- | |||
| style="width: 3em;" | | |||
! style="text-align: left;" |Item | |||
!Stacks | |||
| style="width: 3em;" | | |||
! style="text-align: left;" |Item | |||
!Stacks | |||
| style="width: 3em;" | | |||
! style="text-align: left;" |Item | |||
!Stacks | |||
|- | |||
| | |||
|Acacia Log | |||
| style="text-align:right;" | 0.75 | |||
| | |||
|Acacia Saplings | |||
| style="text-align:right;" |0.25 | |||
| | |||
|Apples | |||
| style="text-align:right;" |0.25 | |||
|- | |||
| | |||
|Birch Log | |||
| style="text-align:right;" |1 | |||
| | |||
|Birch Saplings | |||
| style="text-align:right;" |0.25 | |||
| | |||
|Mangrove Roots | |||
| style="text-align:right;" |4 | |||
|- | |||
| | |||
|Cherry Log | |||
| style="text-align:right;" |2 | |||
| | |||
|Cherry Saplings | |||
| style="text-align:right;" |1.5 | |||
| | |||
|Moss Carpet | |||
| style="text-align:right;" |0.5 | |||
|- | |||
| | |||
|Dark Oak Log | |||
| style="text-align:right;" |18.5 | |||
| | |||
| Dark Oak Saplings | |||
| style="text-align:right;" |0.5 | |||
| | |||
|Sticks | |||
| style="text-align:right;" |4 | |||
|- | |||
| | |||
|Jungle Log | |||
| style="text-align:right;" |1.25 | |||
| | |||
|Jungle Saplings | |||
| style="text-align:right;" |0 | |||
|- | |||
| | |||
|Mangrove Log | |||
| style="text-align:right;" |1.5 | |||
| | |||
|Mangrove Propagule | |||
| style="text-align:right;" |0.25 | |||
|- | |||
| | |||
|Oak Log | |||
| style="text-align:right;" |2 | |||
| | |||
|Oak Sapling | |||
| style="text-align:right;" |0.5 | |||
|- | |||
| | |||
|Spruce Log | |||
| style="text-align:right;" |1.5 | |||
| | |||
| Spruce Sapling | |||
| style="text-align:right;" |0.25 | |||
|} | |||
<br> | |||
[[Category:Tutorials]] | [[Category:Tutorials]] | ||
Latest revision as of 21:37, 14 February 2025
Tree farms can provide many resources - This includes Log, but also, Sapling (which can be composted for Bonemeal). Oak trees can produce Apple, and mangrove trees produce both Moss Carpet, and Mangrove Roots. There are many ways to build an automated tree farm. All of them include a Contraption moving a Mechanical Saw which harvests the whole tree at once and a Deployer which plants new saplings.
This tutorial covers two types of tree farms, a circular farm which uses rotational power and a linear farm which is powered by minecart contraptions.
Circular Tree Farm[edit | edit source]
Items Needed[edit | edit source]
 Mechanical Saw
 Linear Chassis
 Mechanical Bearing
 Deployer
 Portable Storage Interface
 Chest
Chest Super Glue
 Smart Chute,
  Andesite Funnel, or
  Brass Funnel
- Any source of Rotational Power
Optional Items[edit | edit source]
These items may be needed, but are not required for the Machine to work
Items Produced[edit | edit source]
Note that this table only covers 5 tree types
| Item | Average items of type per tree | Notes | ||||
|---|---|---|---|---|---|---|
| Oak | Birch | Spruce | Jungle | Acacia | ||
| ~6.5 | ~6 | ~6.4 | ~7.3 | ~8.4 | ||
| 2.75 | 2.75 | 3.05 | 1.375 | 3.85 | These numbers are for total saplings; one sapling has to be placed back! | |
| 1.65 | 1.65 | 1.83 | 1.65 | 2.31 | ||
| 0.275 | Only Oak trees drop apples. | |||||
Setup[edit | edit source]

- Clear a circular area of desired size where the trees are going to grow. Remember about the sides, as different trees require different space around them.
- Place a Mechanical Bearing in the middle 1 block above the ground, with the sticky side facing down. This should resemble the radius of the circle.
- Attach a row of Linear Chassis to the bearing. The stickable side should be facing outwards.
- Attach 2 Mechanical Saws to the outer end of the Chassis (on the non-stickable side), facing in the direction of rotation of the bearing. Use Super Glue to stick them on.
- Attach a Deployer to the outer end of the Chassis structure, on the opposite side of the Saws, 1 block from the end of the Chassis, facing towards the end.
- Put a Filter or a single Sapling in the Deployer's filter slot.
- Place a Chest anywhere on the Chassis, using Super Glue.
- Attach a Portable Storage Interface on the end of the Chassis, on the top side, facing outwards. Use Super Glue to stick it on.
- Choose the location of the storage, and put a second interface there, 1 block apart. The two interfaces will connect when the whole structure will be passing by the stationary interface.
- Attach a Smart Chute to the stationary Storage Interface. You can also use other means of item transportation, such as a Hopper or Funnel.
- Provide some saplings to the Chest. The Deployer will take and place them when the machine is started.
- Provide Rotation Force to the upper side of the Mechanical Bearing. The machine will start rotating.
- If the structure is rotating in the wrong direction, place a Gearshift above the bearing and power it with a lever.
- If you want to have a way of stopping the structure, do the following:
- Using a Wrench, set the Movement Mode of the bearing to "Only Place when Anchor Destroyed" (the 3rd option).
- Place a Clutch above the bearing or the gearshift, if used.
- Place a lever on the clutch. Powering it will stop the rotation, but the parts of the machine will not be placed, preventing the saplings from being destroyed.
Linear Tree Farm[edit | edit source]
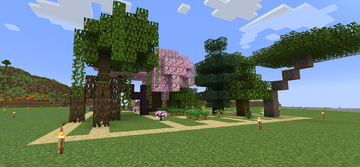
This design produces a very efficient farm that can be extended as far as desired in both length and width. It can simultaneously grow a variety of trees.
Items Needed[edit | edit source]
| Contraption | Rail | Timer | Farm |
|---|---|---|---|
| 42 - 13 - |
1 - 1 - |
2 - 1 - |
4 Stacks - 4 - |
Layout[edit | edit source]
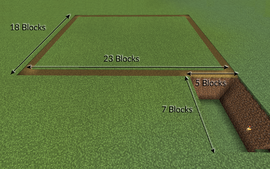
Begin by marking out a rectangle 23 blocks by 18 blocks. Against the right corner of one of the longer sides, dig a hole four blocks deep, five blocks in width, and seven blocks in length.
Underground Rail Line[edit | edit source]
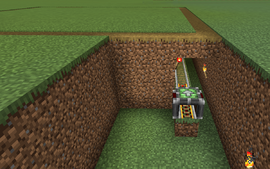
From inside the hole, dig a two block wide tunnel along the right side of the rectangle for the full length. The right side of the tunnel should be level with the bottom of the hole and three blocks high. The left side of the tunnel should start one block above the bottom of the hole and be two blocks high. This forms a bench along the left side of the tunnel on which to run the rails.
Extend the rail bench two blocks into the hole. Place an unpowered Powered Rail at the end of the extension followed by a normal rail then a powered Powered Rail. Fill the rest of the tunnel with rails using Powered Rails and Redstone Torches approximately every 16 blocks. End the rail line with a Powered Rail abutting a solid block. This will cause the harvester contraption to return to the start point.
Place a Cart Assembler over the final Powered Rail with the arrow pointing toward the farm. Right click and hold on the center part of either side of the Cart Assembler to bring up the setting menu. Slide the tab all the way to the right to select "Lock rotation".
Harvesting Contraption[edit | edit source]
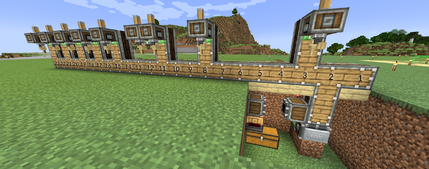
Stack two Linear Chassis on top of the Cart Assembler with the light colored sides facing forward and back. At ground level, place 23 Linear Chassis, with the second from the right lining up above the Cart Assembler. Hold Ctrl and use a Wrench to set the sticky range of all of the Linear Chassis to 1.
Numbering the ground level chassis 1 to 23 from right to left (see picture to the right), place a column of two chassis above chassis 3, 8, 11, 15, 17, 19, 21, and 23. Place another chassis two blocks above chassis 12. The odd spacings account for the varying sizes of tree.

Using a Slimeball, coat the top chassis in each column and attach a Deployer with the hand facing down. Rotate the Deployer with a Wrench to place the filter slot facing backward. Place a different sapling into the filter slot of each Deployer. The five Deployers on the left are for the Birch, Acacia, Jungle, Spruce, and Oak in any order you desire. Place Dark Oak saplings in the pair of Deployers above chassis 11 and 12. Place a Cherry sapling in the Deployer above chassis 8. Finally place a Mangrove Propagule in the right most Deployer.
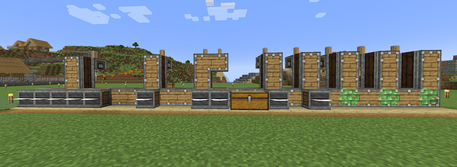
On the front side of the contraption, use a Slimeball to attach Mechanical Saws at ground level. Chassis 1 through 5 each get a Mechanical Saw so as to catch the Mangrove Roots that can be offset from the center of the tree. Place another saw at ground level in front of each of the remain deployers. Finally, using a Slimeball, attach two chests in any of the three double gaps between saws. These chest are to hold saplings for planting. However they will also accumulate a few of every other item. This is normal.
Planting Template[edit | edit source]
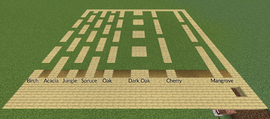
The Deployers will attempt to plant a seedling on every grass block they encounter. Wooden slabs are placed to replace grass blocks in areas where planting is unwanted. Activate the harvesting contraption and temporarily remove it using a Wrench to give access to the grass beneath the contraption.
Replace three rows of grass with slabs along the bottom of the rectangle you laid out. Leaving a hole above the cart assembler is optional. At the far end of the grove, replace the end row with slabs. Place slabs in the planting area in accordance with the figure labeled "Sapling Planting Template." Planting spots for Birch, Acacia, Jungle, Spruce, and Oak are each separated by three slabs as you move along the columns of the template. Acacia and Spruce are offset from the others by two blocks. Dark Oak grows in a 2x2 plot, each separated by 2x2 slabs. Cherry and Mangrove trees are very large, so 5 slabs are used between each planting spot. The first Mangrove planting spot is also offset back to the sixth block from the contraption to allow room for the roots.
Place torches in the columns between the trees to allow the saplings to grow during the night.
Storage[edit | edit source]
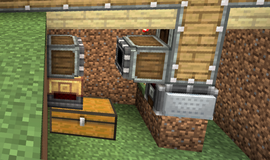
Place a Portable Storage Interface on the left wall three blocks above the bottom of the hole and in line with the chassis. Below the Portable Storage Interface, place a Smart Chute, and below that a Chest or Barrel .Set the Smart Chute's filter to extract EXACTLY 32. This will help to maintain enough saplings in the contraption chests for replanting.
Attach another Portable Storage Interface against the bottom Linear Chassis, facing the first Portable Storage Interface. Use Super Glue to attach this Portable Storage Interface rather than a Slimeball - Do this by clicking on the Portable Storage Interface to start the gluing action, then click on the Cart Assembler to complete the action.
For long term harvesting, you can replace the Chest with a larger Item Vault or route the produce to other automation using a Mechanical Belt.
Activating the Contraption[edit | edit source]
Confirm the Cart Assembler has Lock Rotation configured. If not, set it to lock rotation, place the contraption back in the assembler and cycle the power to off and on again. Remove the contraption with the Wrench.
Place a solid block immediately behind the Cart Assembler. It will stick out in mid air with a one block gap with the ground. This block will force the contraption to move forward when the Powered Rail is activated. Remove the Cart Assembler and the power source used to control it. Then replace the Powered Rail that also pops off.
While standing next to the solid block and facing the tree farm, place the contraption on the unpowered Powered Rail.
Setting a Timer[edit | edit source]
The timer requires one Lever, two Redstone Repeaters, one Pulse Repeater, and four Redstone Dusts. Place a Redstone Repeater facing into the block beneath the contraption's cart. Set this repeater to four ticks delay. Place a Lever immediately to the left of the repeater. Place a Redstone Dust immediately in front of both the lever and repeater. Place a second repeater in front of either of the Redstone Dusts facing away from the mine cart. Set this to two tics delay. Place a Pulse Repeater next in front of the other Redstone Dust facing the cart. Set the delay to 5 minutes or as desired. Place two more Redstone Dusts in front of the Pulse Repeater and the second Redstone Repeater.
Operating the Farm[edit | edit source]
The farm is now ready to operate. To start the clock, momentarily turn the lever on and back off. (Note a button generates too long of a pulse which interferes with the feedback loop.) The farm will run continuously until the clock is interrupted by breaking any one of the redstone dust lines. The contraption should keep a sufficient number of saplings in the contraption chest to allow replanting. It will pass excess saplings into storage.
IMPORTANT: There is a risk of running out of saplings. If you notice a column of trees is missing, simply place some more of that type of sapling in the contraption chest.
Production Rate[edit | edit source]
| Item | Stacks | Item | Stacks | Item | Stacks | |||
|---|---|---|---|---|---|---|---|---|
| Acacia Log | 0.75 | Acacia Saplings | 0.25 | Apples | 0.25 | |||
| Birch Log | 1 | Birch Saplings | 0.25 | Mangrove Roots | 4 | |||
| Cherry Log | 2 | Cherry Saplings | 1.5 | Moss Carpet | 0.5 | |||
| Dark Oak Log | 18.5 | Dark Oak Saplings | 0.5 | Sticks | 4 | |||
| Jungle Log | 1.25 | Jungle Saplings | 0 | |||||
| Mangrove Log | 1.5 | Mangrove Propagule | 0.25 | |||||
| Oak Log | 2 | Oak Sapling | 0.5 | |||||
| Spruce Log | 1.5 | Spruce Sapling | 0.25 |