Melon and Pumpkin Farm: Difference between revisions
Create: Minecraft Mod Wiki>CaptiousToady No edit summary |
Create: Minecraft Mod Wiki>CaptiousToady |
||
| Line 27: | Line 27: | ||
3 - {{ItemLink|Powered Rail|Powered Rails|mc=1}}<br> | 3 - {{ItemLink|Powered Rail|Powered Rails|mc=1}}<br> | ||
2 - {{ItemLink|Redstone Torch|Redstone Torches|mc=1}}<br> | 2 - {{ItemLink|Redstone Torch|Redstone Torches|mc=1}}<br> | ||
2 - Solid Blocks<br> | 2 - {{ItemLink|Solid block|Solid Blocks|mc=1|img1=Birch Planks}}<br> | ||
2 - {{ItemLink|Redstone Repeater|Redstone Repeaters|mc=1}}<br> | 2 - {{ItemLink|Redstone Repeater|Redstone Repeaters|mc=1}}<br> | ||
1 - {{ItemLink|Pulse Repeater}}<br> | 1 - {{ItemLink|Pulse Repeater}}<br> | ||
| Line 49: | Line 49: | ||
1 - {{ItemLink|Cogwheel}}<br> | 1 - {{ItemLink|Cogwheel}}<br> | ||
1 - {{ItemLink|Windmill Bearing}}<br> | 1 - {{ItemLink|Windmill Bearing}}<br> | ||
1 - {{ItemLink|Solid Block|img1=Birch | 1 - {{ItemLink|Solid block|Solid Block|mc=1|img1=Birch Planks}}<br> | ||
32 - {{ItemLink|Windmill Sail|Windmill Sails}} | 32 - {{ItemLink|Windmill Sail|Windmill Sails}} | ||
|} | |} | ||
=== Building the Farm=== | ===Building the Farm=== | ||
The minimum area required is 21 x 12 blocks to contain the farm and machinery. The farm itself is 5 x 16. Dig a trench 14 blocks long. One bucket of water irrigates four blocks in each direction. So, place at least two buckets of water spaced to cover the 14-block length. Cover the trench with | [[File:Melon Farm Final.jpg|thumb|270x270px|Farm Layout]] | ||
See the image "Farm layout." The minimum area required is 21 x 12 blocks to contain the farm and machinery. The farm itself is 5 x 16. Dig a trench 14 blocks long. One bucket of water irrigates four blocks in each direction. So, place at least two buckets of water spaced to cover the 14-block length. Cover the trench with {{MC|Slab|Slabs}} and place three torches spaced along the slabs. | |||
Hoe out a 14-block strip on each side of the slabs and plant the melon and pumpkin seeds. At each end of the two plowed strips dig a hole and cover with a slab. This is to force the plants to place all of the melons and | Hoe out a 14-block strip on each side of the slabs and plant the melon and pumpkin seeds. At each end of the two plowed strips dig a hole and cover with a slab. This is to force the plants to place all of the melons and pumpkins in a straight line. | ||
===Rail Line=== | ===Rail Line=== | ||
[[File:Melon Farm Rail.jpg|thumb|270x270px|Rail | [[File:Melon Farm Rail.jpg|thumb|270x270px|Rail Line Layout]] | ||
See the image "Rail | See the image "Rail Line Layout" as a reference to directions used here. Place a {{MC|Solid block|Solid Block}} two blocks above the slab at the end of one of the planted strips. To the right of the block, dig a hole two blocks deep and place a {{MC|Redstone Torch}}. Place a block of dirt over the redstone torch and then a {{MC|Powered Rail}} on the dirt block. Add {{MC|Rail|Rails}} parallel to the planted strips. When adjacent to the slab at the other end of the planted strip, place a powered rail and redstone torch. To the right of that, place a normal rail followed by an unpowered Powered Rail and a solid block. | ||
=== Harvesting Contraption=== | ===Harvesting Contraption=== | ||
Place a Cart Assembler over the right most powered rail pointing along the track and set the rotation control to Lock Rotation. Place a Linear Chassis on top of the | Place a [[Cart Assembler]] over the right most powered rail pointing along the track and set the rotation control to Lock Rotation. Place a [[Linear Chassis]] on top of the cart assembler with the light-colored sides facing along the track. Place five more linear chassis forming a line to the left of the first linear chassis. Place a chassis under the second and last chassis from the right. Set the sticky range of all of the linear chassis to 1 by holding Ctrl while using a [[Wrench]] on one of the linear chassis. | ||
On the side of the contraption facing the farm, attach a | On the side of the contraption facing the farm, attach a [[Mechanical Drill]] to the ground-level linear chassis using a {{MC|Slimeball}}. Attach a {{MC|Chest}} or {{MC|Barrel}} above the mechanical drill closest to the rail. Using a slimeball, attach a [[Portable Storage Interface]] to the linear chassis above the cart assembler. Use the wrench to face the portable storage interface away from the chest or barrel. | ||
[[File:Melon Farm Timer.jpg|thumb|270x270px|Contraption and Timer]] | [[File:Melon Farm Timer.jpg|thumb|270x270px|Contraption and Timer]] | ||
Place a mine cart in the cart assembler then power it by placing a redstone torch or | Place a mine cart in the cart assembler then power it by placing a redstone torch or {{MC|Lever}} next to the cart assembler. Pick up the contraption using the wrench, then remove the cart assembler and power source. Replace the powered rail that popped off when removing the cart assembler. Finally, replace the contraption while standing behind the rail line's end block. (This assures that the contraption will face the right direction.) | ||
===Setting a Timer=== | ===Setting a Timer=== | ||
See the image "Contraption and Timer " as a reference to directions used here. Place a Redstone Repeater to the left of and facing into the block behind contraption's cart. Set this repeater to four ticks delay. Place a [[Redstone Additions|Pulse Repeater]] two blocks to the left of the redstone repeater facing to the left. Set the delay to 5 minutes or as desired. Place a second redstone repeater just below the pulse repeater, facing to the right and set to two ticks. Place four redstone dusts, one on each side of the pulse repeater and the second redstone repeater. Finally, place a lever next to any of the redstone dusts. | See the image "Contraption and Timer " as a reference to directions used here. Place a {{MC|Redstone Repeater}} to the left of and facing into the block behind contraption's cart. Set this repeater to four ticks delay. Place a [[Redstone Additions|Pulse Repeater]] two blocks to the left of the redstone repeater facing to the left. Set the delay to 5 minutes or as desired. Place a second redstone repeater just below the pulse repeater, facing to the right and set to two ticks. Place four redstone dusts, one on each side of the pulse repeater and the second redstone repeater. Finally, place a lever next to any of the redstone dusts. | ||
===Crafting Whole Melons=== | ===Crafting Whole Melons=== | ||
| Line 77: | Line 78: | ||
====Building the Short Belt==== | ====Building the Short Belt==== | ||
Temporarily place a solid block on the ground next to the powered rail at the far end of the farm on the side away from the farm. Place two | Temporarily place a solid block on the ground next to the powered rail at the far end of the farm on the side away from the farm. Place two [[Shaft|Shafts]] horizontal and end to end extending from the solid block away from the farm. Remove the solid block. Two spaces to the right of the far shaft, place another shaft in parallel. Place a [[Mechanical Belt]] between those two shafts. | ||
====Building the Crafter==== | ====Building the Crafter==== | ||
Build a 3 x 3 vertical array of | Build a 3 x 3 vertical array of [[Mechanical Crafter|Mechanical Crafters]] beginning immediately to the right of the mechanical belt. On the back side of the crafter, use the wrench to join all of the crafters together. On the front side, use the wrench to set the flow pattern to converge on the middle crafter of the right column and eject the product to the right. Place an [[Andesite Funnel]] on the left side of the crafter array so that the mechanical belt will feed items into the crafter. Place a chest or barrel on the right side of the crafter array against the middle block to catch the output of the crafter array. | ||
====Building the Bypass Belt==== | ==== Building the Bypass Belt==== | ||
Place a solid block on the ground immediately to the right of the output chest. Place a shaft extending horizontally from the solid block pointing toward the farm. Remove the solid block. Place a mechanical belt between the two available shafts. Place a chest or barrel with an andesite funnel at the right end of the bypass belt. Place another andesite funnel on the crafter's output chest so that the items empty on the belt. Use the wrench on the top of the andesite funnel to make the triangle on the top point to the belt. | Place a solid block on the ground immediately to the right of the output chest. Place a shaft extending horizontally from the solid block pointing toward the farm. Remove the solid block. Place a mechanical belt between the two available shafts. Place a chest or barrel with an andesite funnel at the right end of the bypass belt. Place another andesite funnel on the crafter's output chest so that the items empty on the belt. Use the wrench on the top of the andesite funnel to make the triangle on the top point to the belt. | ||
====Installing the Item Handling Components ==== | ==== Installing the Item Handling Components==== | ||
Place the two | Place the two [[Brass Tunnel|Brass Tunnels]] side by side on the two belts, one block to the right of the left end of the belts. Place a melon slice in the filter slot of the far side tunnel. Configure a [[Filter|List Filter]] to reject melon slices. Place the list filter in the filter slot of the nearside tunnel. Place a portable storage interface on the left side of the nearer tunnel then use the wrench to make it face toward the farm. On the back side of the portable storage interface, place an andesite funnel emptying on the end of the short belt. Use the wrench on the funnel to make the triangle on the top point toward the belt. | ||
===Power Source=== | ===Power Source=== | ||
[[File:Melon Farm Crafter Back.jpg|thumb|270x270px|Backside of the Melon Crafter Showing the Windmill]] | [[File:Melon Farm Crafter Back.jpg|thumb|270x270px|Backside of the Melon Crafter Showing the Windmill]] | ||
See the image "Backside of the Melon Crafter Showing the Windmill" as a reference to directions used here. Place a | See the image "Backside of the Melon Crafter Showing the Windmill" as a reference to directions used here. Place a [[Gearbox|Vertical Gearbox]] on the ground with one of the shafts attaching to the shaft of the short belt where it touches the crafter. Place two more vertical gearboxes on top of the first one using the same orientation. On the side of the top gearbox facing the belt, place a [[Cogwheel]] to power the crafter array. | ||
Place a Rotational Speed Controller on the ground one block in front of the bottom gearbox. Turn the rotational speed controller so that the shaft does not connect to the gearbox. Place a Large Cogwheel in the rotational speed controller so that it connects with the middle gearbox. | Place a [[Rotation Speed Controller|Rotational Speed Controller]] on the ground one block in front of the bottom gearbox. Turn the rotational speed controller so that the shaft ''does not'' connect to the gearbox. Place a [[Cogwheel|Large Cogwheel]] in the rotational speed controller so that it connects with the middle gearbox. | ||
Place a Windmill | Place a [[Windmill Bearing]] so that its shaft connects to the shaft of the rotational speed controller. Place a solid block on the sticky face of the windmill bearing. Attach 32 [[Windmill Sail|Windmill Sails]] to the solid block. Right click the windmill bearing to attach the sails and start the windmill. The direction on the windmill bearing does not matter. On the rotational speed controller, set the speed to 113 RPM and the direction to clockwise. | ||
===Operating the Farm=== | ===Operating the Farm=== | ||
The farm is now ready to operate. With the contraption placed on the unpowered powered rail, momentarily turn the | The farm is now ready to operate. With the contraption placed on the unpowered powered rail, momentarily turn the lever on and back off. The contraption will launch and the timer will start. The farm will run continuously until the clock is interrupted by breaking any one of the redstone dust lines. The farm will produce an average of 24 melons and 24 pumpkins per hour. You will need to either empty the final chest regularly or feed it automatically into a larger storage system. | ||
[[Category:Tutorials]] | [[Category:Tutorials]] | ||
Revision as of 04:29, 25 December 2023
Although automated Melon and Pumpkin farms can be made in vanilla Minecraft, Create makes them much easier to build. And Create can automatically craft Melon Slices back into whole melons for trading.
Compact Melon and Pumpkin Farm
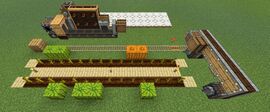
This design produces a very efficient farm that can be extended in length and tiled in width. This tutorial will create a balanced production of whole Melons and Pumpkins.
Balancing Production
Pumpkins harvest whole. Melons harvest as Melon Slices which must be crafted together to create whole melons. Melon harvests provide an average of five slices each while crafting a whole melon requires nine slices. This means that more melons must be planted than pumpkins.
Planting nine melons for every five pumpkins will give a balanced production rate. The farm should therefore be built in multiples groups of fourteen (nine melons plus five pumpkins.) This tutorial builds a 28-plant farm which is two groups of fourteen. Therefore, eighteen melon plants and ten pumpkin plants are needed.
Items Needed
| Contraption | Rail & Timer | Farm | Crafter |
|---|---|---|---|
| 8 - 2 - |
1 - 1 - |
18 - 2 - |
9 - 2 - |
Building the Farm

See the image "Farm layout." The minimum area required is 21 x 12 blocks to contain the farm and machinery. The farm itself is 5 x 16. Dig a trench 14 blocks long. One bucket of water irrigates four blocks in each direction. So, place at least two buckets of water spaced to cover the 14-block length. Cover the trench with Slabs and place three torches spaced along the slabs.
Hoe out a 14-block strip on each side of the slabs and plant the melon and pumpkin seeds. At each end of the two plowed strips dig a hole and cover with a slab. This is to force the plants to place all of the melons and pumpkins in a straight line.
Rail Line

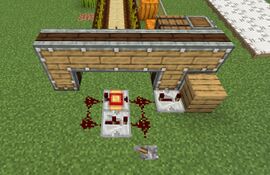
See the image "Rail Line Layout" as a reference to directions used here. Place a Solid Block two blocks above the slab at the end of one of the planted strips. To the right of the block, dig a hole two blocks deep and place a Redstone Torch. Place a block of dirt over the redstone torch and then a Powered Rail on the dirt block. Add Rails parallel to the planted strips. When adjacent to the slab at the other end of the planted strip, place a powered rail and redstone torch. To the right of that, place a normal rail followed by an unpowered Powered Rail and a solid block.
Harvesting Contraption
Place a Cart Assembler over the right most powered rail pointing along the track and set the rotation control to Lock Rotation. Place a Linear Chassis on top of the cart assembler with the light-colored sides facing along the track. Place five more linear chassis forming a line to the left of the first linear chassis. Place a chassis under the second and last chassis from the right. Set the sticky range of all of the linear chassis to 1 by holding Ctrl while using a Wrench on one of the linear chassis.
On the side of the contraption facing the farm, attach a Mechanical Drill to the ground-level linear chassis using a Slimeball. Attach a Chest or Barrel above the mechanical drill closest to the rail. Using a slimeball, attach a Portable Storage Interface to the linear chassis above the cart assembler. Use the wrench to face the portable storage interface away from the chest or barrel.
Place a mine cart in the cart assembler then power it by placing a redstone torch or Lever next to the cart assembler. Pick up the contraption using the wrench, then remove the cart assembler and power source. Replace the powered rail that popped off when removing the cart assembler. Finally, replace the contraption while standing behind the rail line's end block. (This assures that the contraption will face the right direction.)
Setting a Timer
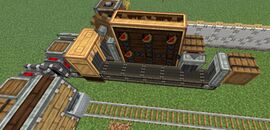
See the image "Contraption and Timer " as a reference to directions used here. Place a Redstone Repeater to the left of and facing into the block behind contraption's cart. Set this repeater to four ticks delay. Place a Pulse Repeater two blocks to the left of the redstone repeater facing to the left. Set the delay to 5 minutes or as desired. Place a second redstone repeater just below the pulse repeater, facing to the right and set to two ticks. Place four redstone dusts, one on each side of the pulse repeater and the second redstone repeater. Finally, place a lever next to any of the redstone dusts.
Crafting Whole Melons
See the image "Crafter from Above" as a reference to directions used here. The crafter accepts pumpkins and melon slices from the contraption through the portable storage interface which places all the produce on a short belt. The belt runs through two brass tunnels which feed the melon slices through the crafter and divert the pumpkins to a bypass belt. The whole melons from the crafter are placed back on the bypass belt and fed into storage along with the pumpkins. The device is powered by a horizontal windmill.
Building the Short Belt
Temporarily place a solid block on the ground next to the powered rail at the far end of the farm on the side away from the farm. Place two Shafts horizontal and end to end extending from the solid block away from the farm. Remove the solid block. Two spaces to the right of the far shaft, place another shaft in parallel. Place a Mechanical Belt between those two shafts.
Building the Crafter
Build a 3 x 3 vertical array of Mechanical Crafters beginning immediately to the right of the mechanical belt. On the back side of the crafter, use the wrench to join all of the crafters together. On the front side, use the wrench to set the flow pattern to converge on the middle crafter of the right column and eject the product to the right. Place an Andesite Funnel on the left side of the crafter array so that the mechanical belt will feed items into the crafter. Place a chest or barrel on the right side of the crafter array against the middle block to catch the output of the crafter array.
Building the Bypass Belt
Place a solid block on the ground immediately to the right of the output chest. Place a shaft extending horizontally from the solid block pointing toward the farm. Remove the solid block. Place a mechanical belt between the two available shafts. Place a chest or barrel with an andesite funnel at the right end of the bypass belt. Place another andesite funnel on the crafter's output chest so that the items empty on the belt. Use the wrench on the top of the andesite funnel to make the triangle on the top point to the belt.
Installing the Item Handling Components
Place the two Brass Tunnels side by side on the two belts, one block to the right of the left end of the belts. Place a melon slice in the filter slot of the far side tunnel. Configure a List Filter to reject melon slices. Place the list filter in the filter slot of the nearside tunnel. Place a portable storage interface on the left side of the nearer tunnel then use the wrench to make it face toward the farm. On the back side of the portable storage interface, place an andesite funnel emptying on the end of the short belt. Use the wrench on the funnel to make the triangle on the top point toward the belt.
Power Source
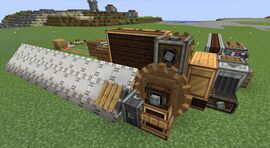
See the image "Backside of the Melon Crafter Showing the Windmill" as a reference to directions used here. Place a Vertical Gearbox on the ground with one of the shafts attaching to the shaft of the short belt where it touches the crafter. Place two more vertical gearboxes on top of the first one using the same orientation. On the side of the top gearbox facing the belt, place a Cogwheel to power the crafter array.
Place a Rotational Speed Controller on the ground one block in front of the bottom gearbox. Turn the rotational speed controller so that the shaft does not connect to the gearbox. Place a Large Cogwheel in the rotational speed controller so that it connects with the middle gearbox.
Place a Windmill Bearing so that its shaft connects to the shaft of the rotational speed controller. Place a solid block on the sticky face of the windmill bearing. Attach 32 Windmill Sails to the solid block. Right click the windmill bearing to attach the sails and start the windmill. The direction on the windmill bearing does not matter. On the rotational speed controller, set the speed to 113 RPM and the direction to clockwise.
Operating the Farm
The farm is now ready to operate. With the contraption placed on the unpowered powered rail, momentarily turn the lever on and back off. The contraption will launch and the timer will start. The farm will run continuously until the clock is interrupted by breaking any one of the redstone dust lines. The farm will produce an average of 24 melons and 24 pumpkins per hour. You will need to either empty the final chest regularly or feed it automatically into a larger storage system.