Schematicannon: Difference between revisions
Create: Minecraft Mod Wiki>Purplecrow4 Added section detailing the GUI |
BoxWithout (talk | contribs) m 19 revisions imported |
(No difference)
| |
Latest revision as of 21:36, 14 February 2025
The Schematicannon is a special type of machine used to build structures with the use of Schematics. It is a useful contraption which is primarily used within Survival Mode to deploy structures block-by-block, as the function of direct placement for Schematics are limited exclusively to Creative Mode.
Obtaining[edit | edit source]
Crafting[edit | edit source]
| Name | Ingredients | Crafting Recipe |
|---|---|---|
| Schematicannon | Block of Iron + Any Log + Smooth Stone + Dispenser |
Usage[edit | edit source]
Cannon Prepping[edit | edit source]
A Schematic must first be positioned in the world before being placed in the cannon. Position the Schematic by right clicking. While holding the schematic, the selection and a control menu can be viewed.
The cannon will take the blocks required to build the structure from any adjacent inventories. The cannon will accept any inventory-type block as long as it has the function to output its contents.
The cannon feeds on Gunpowder, consuming once for every 400 blocks. The slot for gunpowder is located in the upper left segment of the menu, and may hold up to a stack at any given period. The cannon may consume up to 5 gunpowder when powered for the first time, and will have a bar for a fuel indicator next to the input slot. (Keep in mind that using Creative Crates will also allow infinite gunpowder)
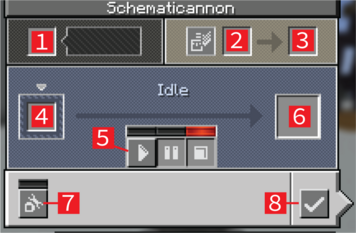
Cannon GUI (Graphical User Interface) Breakdown[edit | edit source]
- Input gunpowder
- Input book for printed crafting ingredients list
- Output of printed ingredients list book
- Input Schematic
- Start, pause, and stop cannon
- Output blank schematic
- Settings
- Close dialog
Cannon Settings[edit | edit source]
In the bottom segment of the cannon's menu, there is a button that indicates the printer settings. Clicking the button will show a list of the following settings.
Solid Block Settings[edit | edit source]
Only one of the four following settings may be active at any given time. These settings indicate the behaviour of Schematic overlap with Solid blocks in the selected area.
- Don't Replace Solid Blocks - The cannon will never replace any Solid blocks in its working area, only non-Solid and Air.
- Replace Solid with Solid - The cannon will only replace Solid blocks in its working area if the Schematic contains a solid block at the location.
- Replace Solid with Any (Default Selection) - The cannon will replace Solid blocks in its working area if the Schematic contains any block at the location.
- Replace Solid with Empty - The cannon will clear out all blocks in its working area, including those replaced by Air.
Miscellaneous Settings[edit | edit source]
These settings may be toggled independently of the other settings.
- Skip missing Blocks - If the cannon cannot find a required block for placement, it will continue at the next location.
- Protect Tile Entities (Default Selection) - The cannon will avoid replacing data holding blocks such as Chests.
Checklist[edit | edit source]
A Book or a Clipboard may be placed in the cannon's menu (currently located in the upper right segment of the GUI) to create a list of the required blocks in the form of a Written Book, factoring in the blocks available in adjacent inventories. The same book may be continuously re-used to update the checklist, given any changes to the adjacent inventory or the progress of the build.
Cannon Firing[edit | edit source]
Once the settings and all preliminary conditions are met for the cannon, the player may begin the firing process. Note: the cannon does not have to face the correct direction of the selected area, as it will self-correct during the process. In the middle segment of the menu for the cannon, there are 3 buttons that control the status of the cannon. Play, Pause, and Stop respectively. By default, the cannon begins in a paused state, with a yellow indicator on top. To begin the firing of the cannon, click on the Play button. This will activate the firing of the cannon, with a green indicator on top. If the player wishes to stop/end the firing, they do so by pressing the Stop button, which will function as if the Schematic is finished building.
The cannon will build in an additive method, beginning from the bottom layer and working its way to the top.
The cannon does not have a native limit for its range. However, it will only build given that the selected area is loaded within its respective chunk. Therefore, it's recommended that the cannon and player stay near the area of selection, or have another player be loading the chunks if used in a server. The cannon additionally may only build within its designated dimension.
Once the cannon finishes firing, it will play a 'Ding' sound to let the player know that the building process is complete. The menu will return to its stopped state, with a red indicator on top of the button. The Schematic consumed will then return into an Empty Schematic, which may be used again in the future.
History[edit | edit source]
| Blocks | |||||||||||||||||||||||||||||||||||
|---|---|---|---|---|---|---|---|---|---|---|---|---|---|---|---|---|---|---|---|---|---|---|---|---|---|---|---|---|---|---|---|---|---|---|---|
| |||||||||||||||||||||||||||||||||||
| |||||||||||||||||||||||||||||||||||
| |||||||||||||||||||||||||||||||||||
