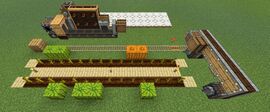
Melon and Pumpkin Farm
Although automated melon and pumpkin farms can be made in vanilla Minecraft, Create makes them much easier to build. And Create can automatically craft melon slices back into whole melon for trading.
Compact Melon and Pumpkin Farm

This design produces a very efficient farm that can be extended in length and tiled in width. This tutorial will create a balanced production of whole Melons and Pumpkins.
Balancing Production
Pumpkins harvest whole. Melons harvest as Melon Slices which must be crafted together to create whole melons. Melon harvests provide an average of five slices while crafting requires nine slices to produce a whole melon. This means that more melons must be planted than pumpkins.
Planting nine melons for every five pumpkins will give a balanced production rate. The farm then should be built in multiples groups of fourteen (nine melons plus five pumpkins.) This tutorial builds a 28-plant farm which is two groups of fourteen. Therefore, eighteen melon plants and ten pumpkin plants are needed.
Items Needed
| Contraption | Rail & Timer | Farm | Crafter |
|---|---|---|---|
| 8 - 9 - |
1 - 1 - |
18 - 2 - |
9 - 2 - |
Building the Farm
The minimum area required is 21 x 12 blocks to contain the farm and machinery. The farm itself is 5 x 16. Dig a trench 14 blocks long. One bucket of water irrigates four blocks in each direction. So, place at least two buckets of water spaced to cover the 14-block length. Cover the trench with slabs and place three torches spaced along the slabs.
Hoe out a 14-block strip on each side of the slabs and plant the melon and pumpkin seeds. At each end of the two plowed strips dig a hole and cover with a slab. This is to force the plants to place all of the melons and pumplinks in a straight line.
Rail Line

See the image "Rail line layout" as a reference to directions used here. Place a solid block two blocks above the slab at the end of one of the planted strips. To the right of the block, dig a hole two blocks deep and place a redstone torch. Place a block of dirt over the redstone torch and then a Powered Rail on the dirt block. Add rails parallel to the planted strips. When adjacent to the slab at the other end of the planted strip, place a powered rail and redstone torch. To the right of that, place a normal rail followed by an unpowered Powered Rail and a solid block.
Harvesting Contraption
Place a Cart Assembler over the right most powered rail pointing along the track and set the rotation control to Lock Rotation. Place a Linear Chassis on top of the Cart Assembler with the light-colored sides facing along the track. Place five more linear chassis forming a line to the left of the first linear chassis. Place a chassis under the second and last chassis from the right. Set the sticky range of all of the Linear Chassis to 1 by holding Ctrl while using a wrench on one of the Linear Chassis.
On the side of the contraption facing the farm, attach a mechanical drill to the ground level linear chassis using a slime ball. Attach a chest or barrel above the mechanical drill closest to the rail. Using a slime ball, attach a Portable Storage Interface to the linear chassis above the Cart Assembler. Use the wrench to face the portable storage interface away from the chest or barrel.

Place a mine cart in the cart assembler then power it by placing a redstone torch or lever next to the cart assembler. Pick up the contraption using the wrench, then remove the cart assembler and power source. Replace the powered rail that popped off when removing the cart assembler. Finally, replace the contraption while standing behind the rail line's end block. (This assures that the contraption will face the right direction.)
Setting a Timer
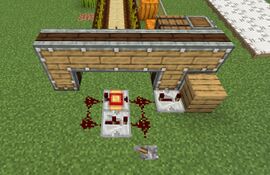
See the image "Contraption and Timer " as a reference to directions used here. Place a Redstone Repeater to the left of and facing into the block behind contraption's cart. Set this repeater to four ticks delay. Place a Pulse Repeater two blocks to the left of the redstone repeater facing to the left. Set the delay to 5 minutes or as desired. Place a second redstone repeater just below the pulse repeater, facing to the right and set to two ticks. Place four redstone dusts, one on each side of the pulse repeater and the second redstone repeater. Finally, place a lever next to any of the redstone dusts.